

User Guide
Quick Links
- To view a list of available video tutorials on the most common topics, click here
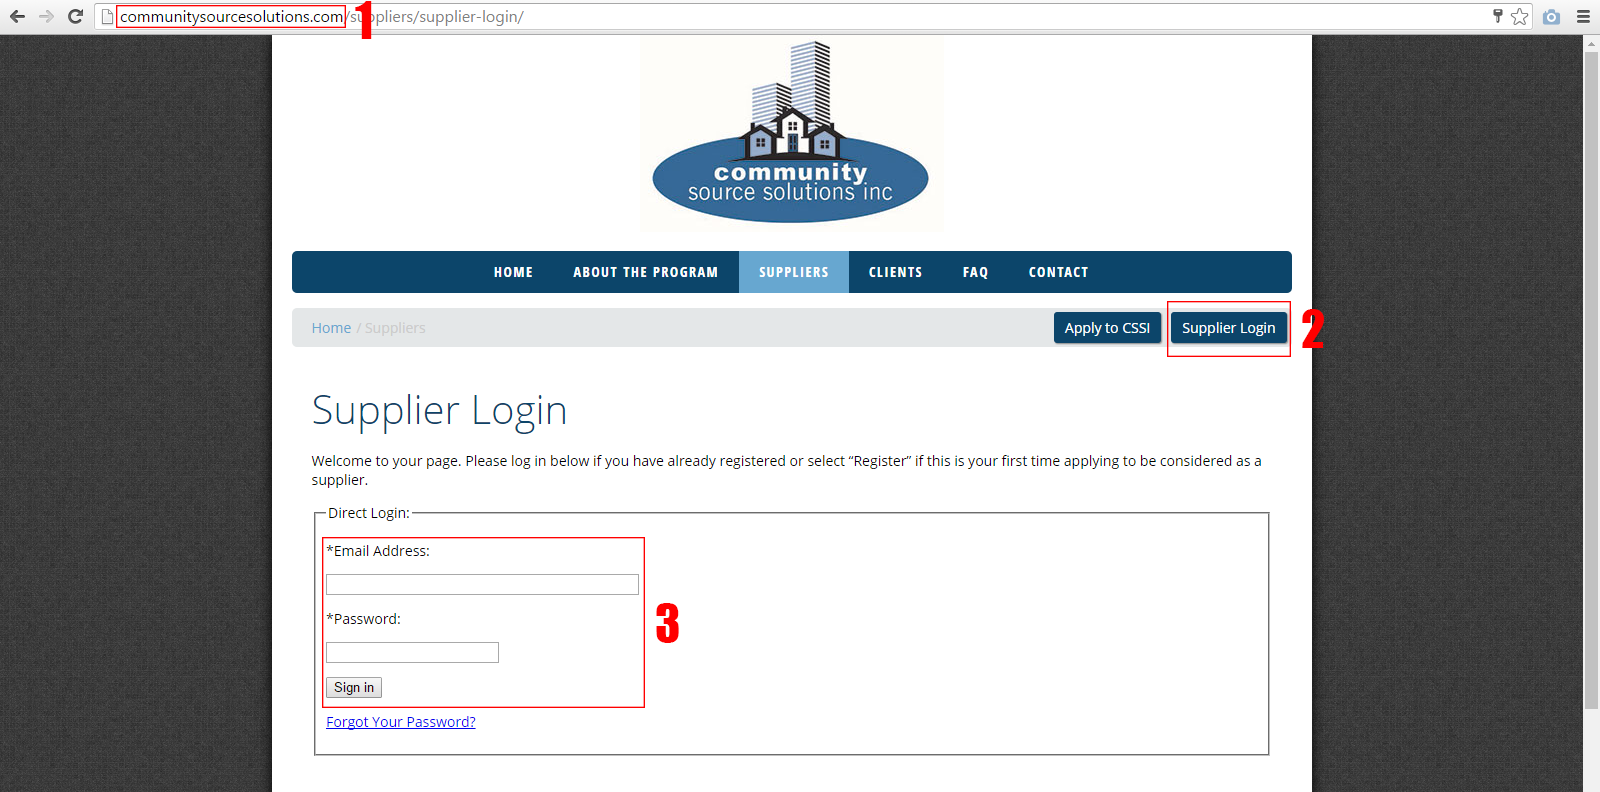
1A. To Sign In
1B. Forgot Your Password?
1C. Adding Additional Users to Your Supplier Profile
1D. Removing Users from Your Supplier Profile
1E. Renewing your CSSI account
1F. Updating your WSIB Clearance Certificate
1G. Updating your Certificate of Insurance
2A. Purchase Order Dashboard
2B. Change of Purchase Order Status
2C. Checking Your Purchase Order Panel for Updates
2D. Managing Your Purchase Orders
2E. Cancelling or Rejecting a Purchase Order
2F. Uploading Your Invoice To A Purchase Order
2G. Uploading Your Invoice For A Contract
2H. RFQ Bulletin Board
3A. Checking Your Quotation Request
3B. Printing Your Quotation Request
4A. Having Trouble with Your Browser?
4B. Tutorials
4C. Questions/Tech Support
1A. To Sign In
- Go to www.communitysourcesolutions.com
- Click on the Supplier Login button
- Enter your e-mail address and the password that you used when you applied to CSSI and click on the Sign In button
1B. Forgot Your Password?
- Go to www.communitysourcesolutions.com
- Click on the Supplier Login button
- Click on the Forgot Your Password? link at the bottom
- Fill in your email address used to sign-up for CSSI
- Click Submit
- You will then receive an email from CSSI with a link within it. Click the link and you will be brought to a page like this:
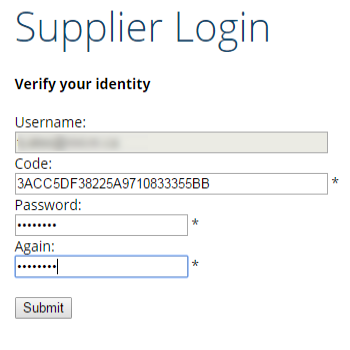
Just fill in what you would like your new password to be (twice) and click Submit.
1C. Adding Additional Users to Your Supplier Profile
( Video tutorial available here )
The CSSI cloud system now allows additional access for more than one employee to a Supplier Profile. With this access, you may grant other staff to be able to maintain, update, and monitor the status of all activity in the system. The primary e-mail account is the master account that can add or remove users. All e-mail addresses on file on a Supplier Profile will be included when there are updates from the system.
To manage your user accounts, log in to your account and click the Add User button at the top of your profile. A pop-up box will appear wherein you can input the data as required:
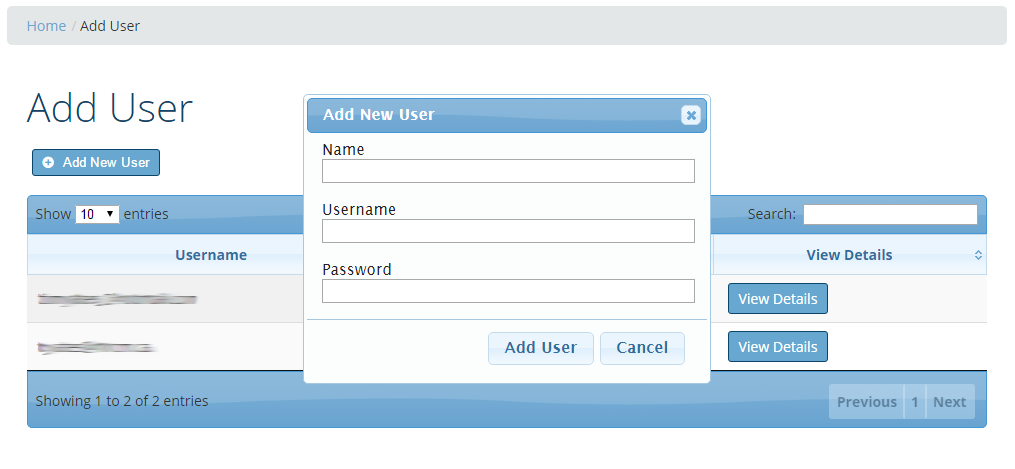
- Name: Employee Name
- Username: Employee e-mail address for sign-in
- Password: Employee password
Click Add User at the bottom of the pop-up box to submit. The employee now has access to your Supplier account's CSSI panel.
1D. Removing Users from Your Supplier Profile
On the master user account, click on Add User to access the user administration panel. Click View Details beside the staff you wish to remove. A pop-up box will appear with their information. Click Delete User.
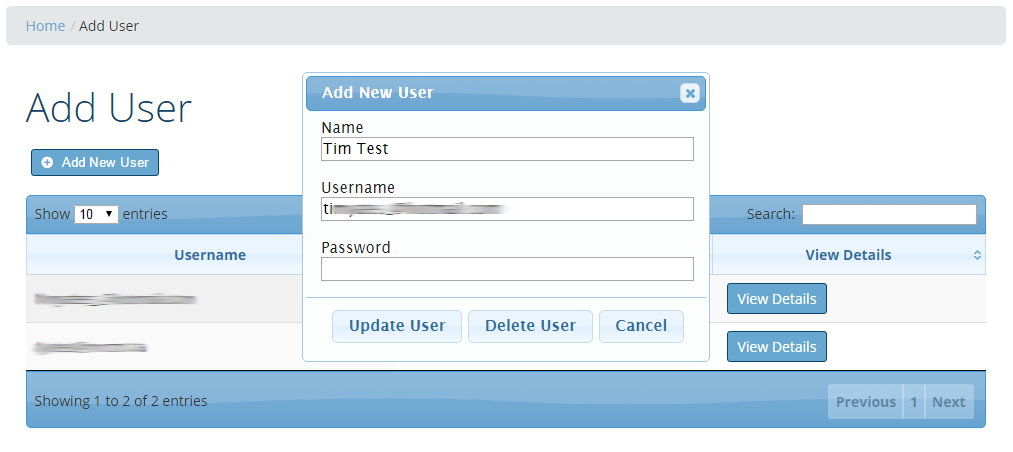
The employee no longer has access to the system. For your own security purposes and data protection, we encourage you to maintain staff changes and access within your CSSI panel as these changes occur.
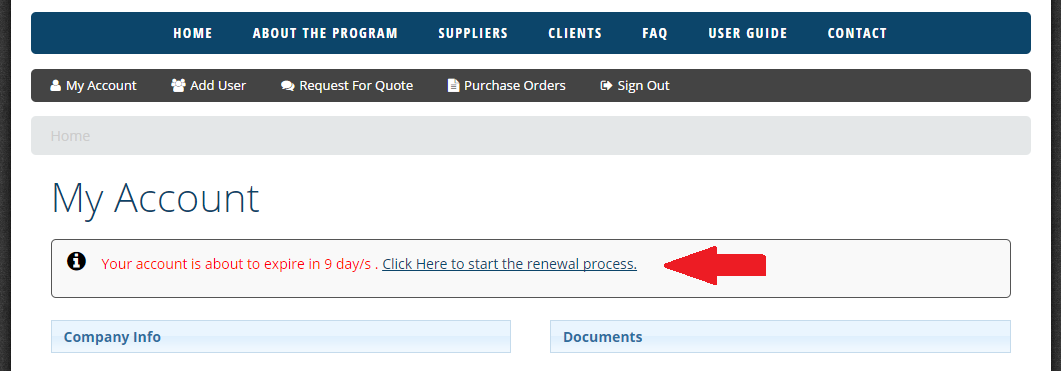
1E. Renewing your CSSI account
Log in to your CSSI primary user profile by visiting http://communitysourcesolutions.com and clicking Supplier Login. Upon logging in, click your ‘My Account’ button on the navigation bar and click the ‘Click Here to start the renewal process’ button beside the red warning text advising you of your expiration time left.
As part of your renewal, you must print and sign and upload a picture or copy of your signed 2019 Supplier Code Of Conduct. You may click the 'Print' button, print the document and sign it. Then upload a copy of your signed document by clicking the ‘Choose file’ button and navigating to it on your computer. An easy way to transfer the document to your computer after printing and signing is to take a picture with a cell phone and e-mail it to yourself.
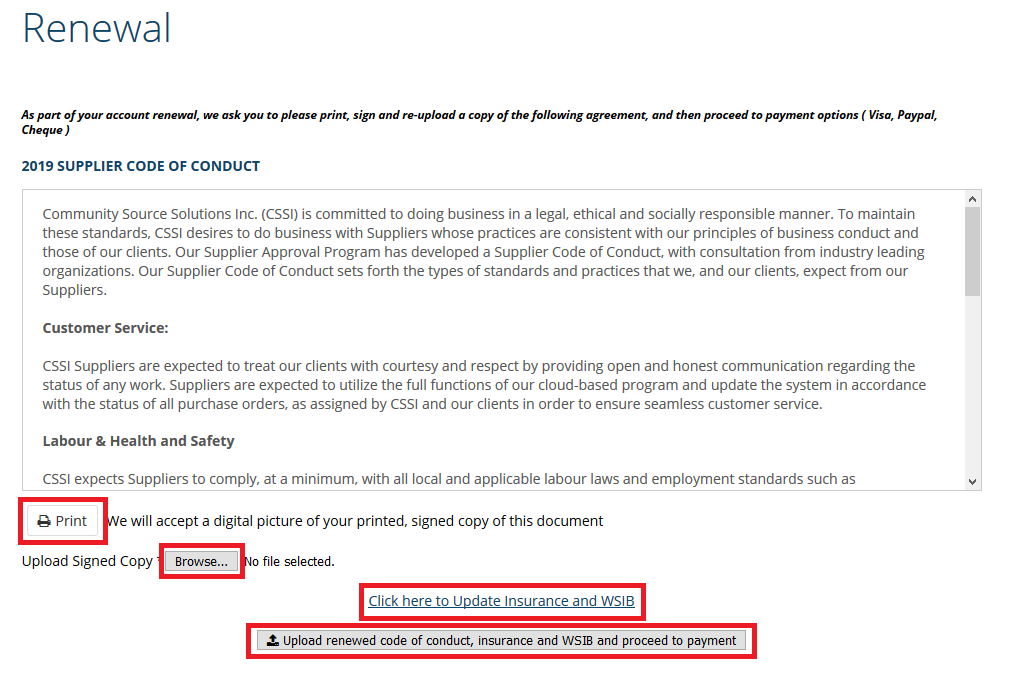
After uploading the signed document, you will need to upload your Current WSIB Clearance as well as Insurance Information. To do this, select the option "Click here to Update Insurance and WSIB". Fill in the required information and upload your files in the dialog that appears, then save changes and close the window. Now, click the ‘Upload renewed code of conduct, insurance and WSIB and proceed to payment' button. ONLY update your Account Number and Firm Number if it has changed.
NOTE: As part of the MRCM Approved Supplier Program, all suppliers are required to have insurance. The Certificate of Insurance must list Maple Ridge Community Management, 5753 Coopers Avenue, Mississauga ON L4Z 1R9, as an Additionally Insured Party and as a Certificate Holder.
Click the 'Pay Now' button to process your renewal payment via Visa or Paypal or E-Transfer. If you wish to mail a cheque, click the Pay by Cheque box and you will be provided the mailing address. Paying by cheque may delay processing of your renewal – if the renewal application and payment is not received prior to your expiration you will be automatically suspended by the system. Once we have reviewed your renewal application and verified your administrative payment, you will be re-approved and renewed for 1 year as of that approval date.

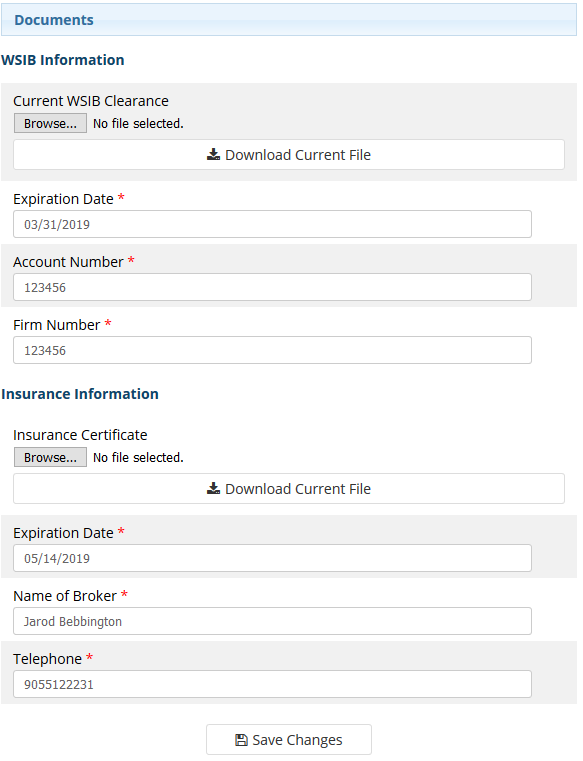
1F. Updating your WSIB Clearance Certificate
As part of the MRCM Approved Supplier Program, Suppliers must be eligible for WSIB Clearance Certificates. On the WSIB system, MRCM is listed as MAPLE RIDGE COMMUNITY MANAGEMENT LTD. / MAPLE RIDGE PROPERTY MANAGEMENT.
To upload your WSIB Clearance Certificate, please follow the instructions below:
- Click 'My Account' at the top left of your profile
- Click 'Choose File' underneath the WSIB Information section and select an image or copy of your new, valid insurance certificate
- Click into the 'Expiration Date field, and update the new expiration date of your clearance certificate
- Click into the Account Number field and update your account number ONLY if this has changed
- Click into the Firm Number field and update your firm number ONLY if this has changed
- Scroll to the bottom of your profile page and click 'Save Changes'
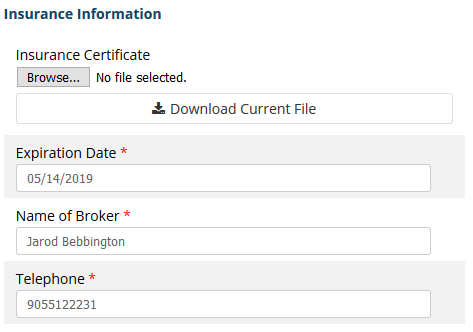
1G. Updating your Certificate of Insurance
As part of the MRCM Approved Supplier Program, all suppliers are required to have insurance. The Certificate of Insurance must list Maple Ridge Community Management, 5753 Coopers Avenue, Mississauga ON L4Z 1R9, as an Additionally Insured Party and as a Certificate Holder.
To update your Certificate of Insurance, please follow the instructions below:
- Click 'My Account' at the top left of your profile.
- Click 'Choose File' underneath the Insurance Information section and select an image or copy of your new, valid insurance certificate
- Click in the 'Expiration Date' field and update the new expiration date of your Insurance Certificate (This step is important as our system searches and flags for expired insurance policies based on the dates entered in this field)
- Scroll to the bottom of your profile page and click 'Save Changes'
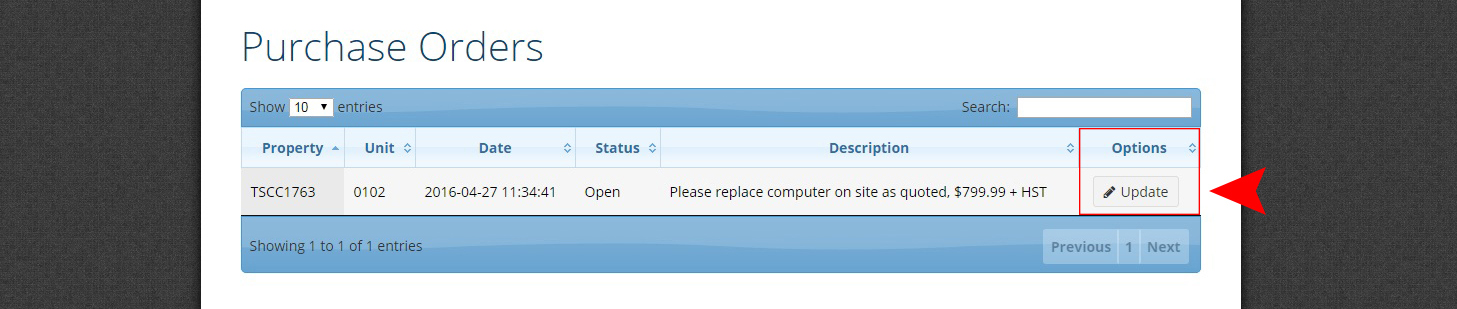
2A. Purchase Order Dashboard
(Communication tools demo video available here)
Here you will see a list of any/all purchase orders assigned to your company. We refer to this as your Purchase Order Dashboard because it gives you a high level view with basic information for each purchase orders. On your Dashboard, you will receive:
- The purchase order number
- A summary with the property identifier
- The unit number
- The date assigned
- The current status of the purchase order
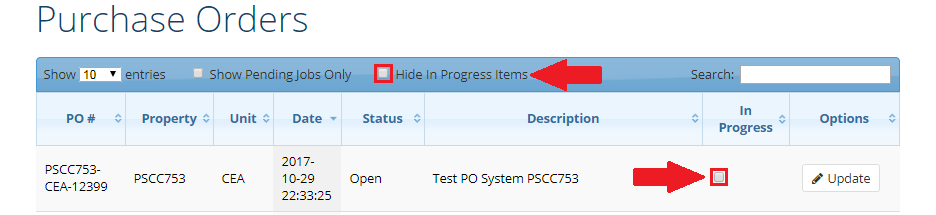
- The In Progress checkbox
- The options update button
- The Hide In Progress Items checkbox

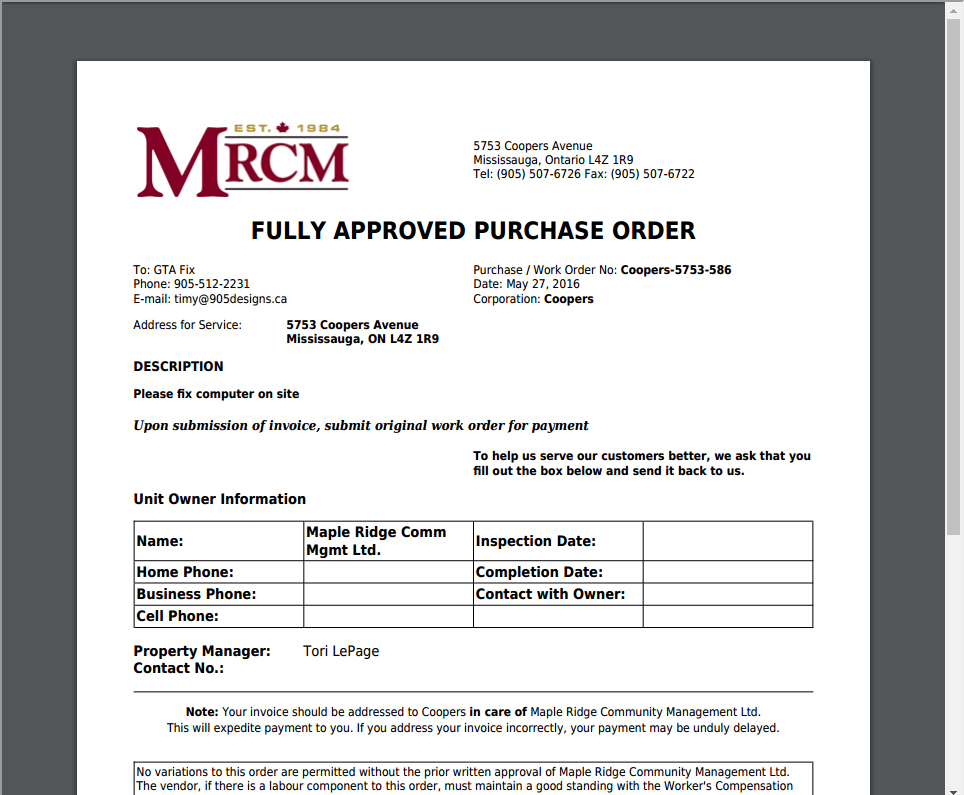
When selecting the Update button, you will be able to open up each purchase order to view its specific details (customer name, phone number, comments, etc):
Purchase orders can be flagged as "In Progress" by marking the checkbox under the In Progress column. When purchase orders have been flagged as "In Progress" they can be hidden from the list by marking the Hide In Progress Items checkbox above the purchase order list.
2B. Change of Purchase Order Status
In this same panel you can click on the status and update it once the work is complete.
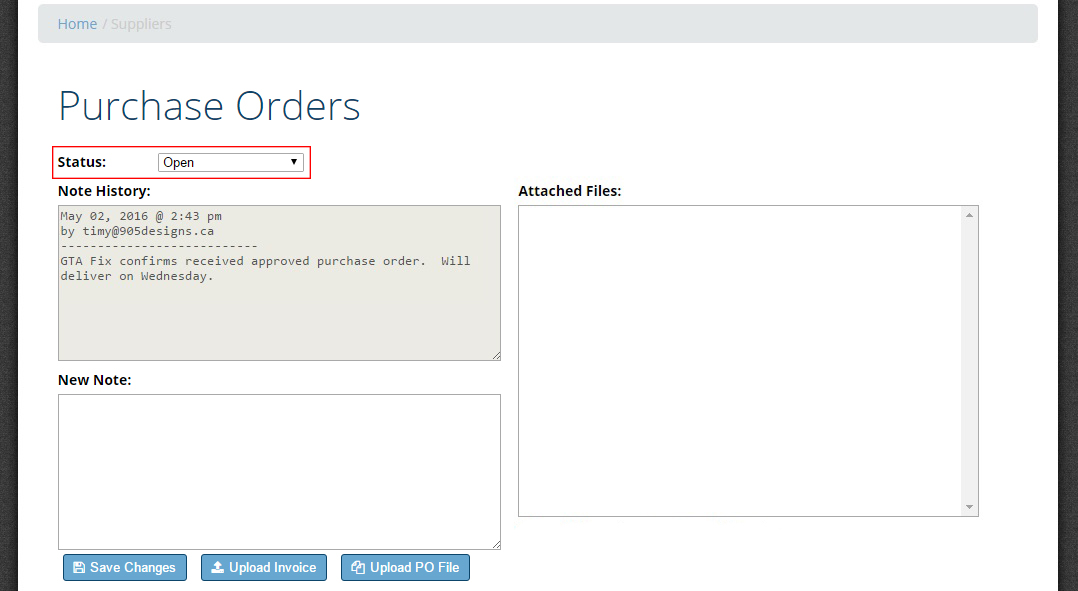
Within this same window, you can add comments that will be sent directly to the property manager and customer service representative that assigned you the work.
Within this panel, you will also find any correspondence that the Property Manager or Customer Service Rep sent you. E-mail notifications as well as updates will be visible to, inside this panel.

2C. Checking Your Purchase Order Panel for Updates
You will know when to check your purchase order dashboard for updates or newly assigned jobs via an alert e-mail that will be sent to you when they are dispatched.
Login, using the steps noted above. Go to your purchase order panel for updates or new assigned jobs. At a glance, you will be able to see the new purchase order assigned, as it will be dated so it will be the latest, most recent date. For more information on the full scope of the purchase order select the Update button and click. Review the full job with all the required information.
2D. Managing Your Purchase Orders
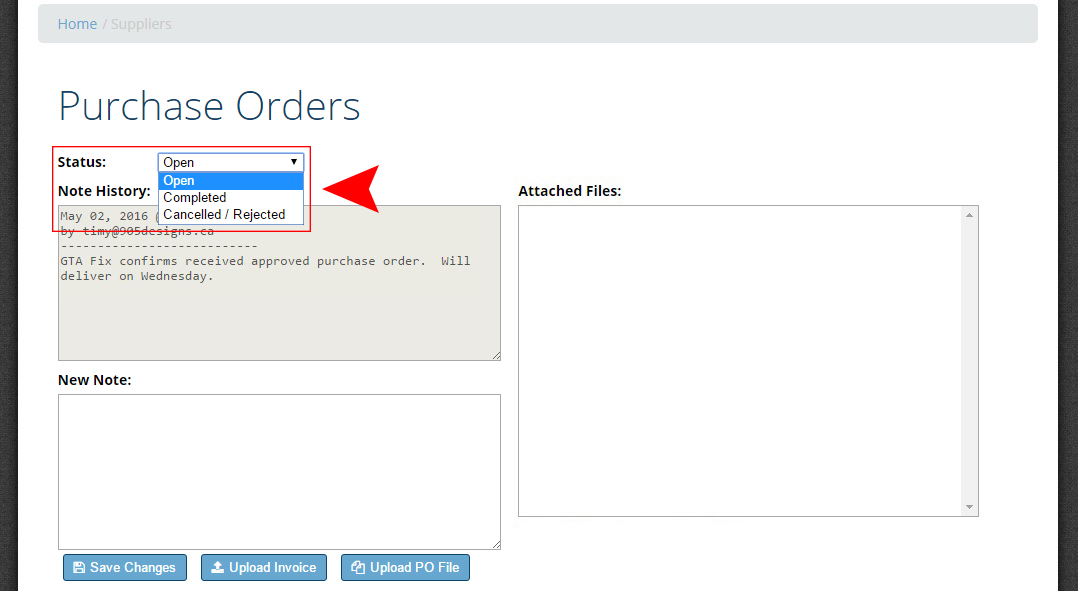
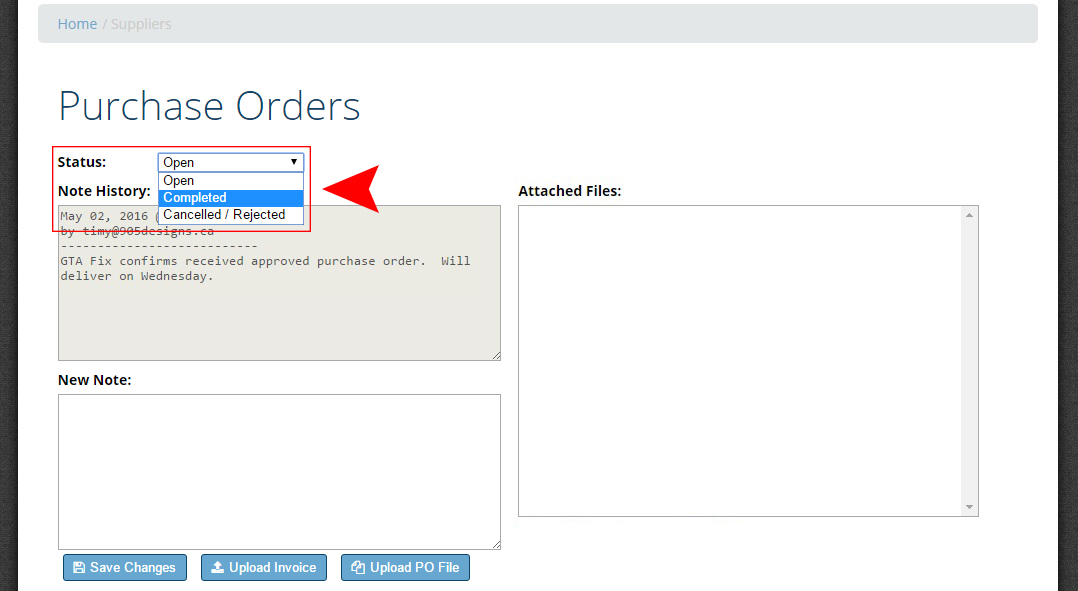
Login, as described above, to the Supplier Panel Dashboard to view and track all your purchase orders. Click on the Status of each work.
Click on the status to expose a drop down menu that allows you to select from a variety of status updates. Change the status of the work order to reflect what the new current status should be.
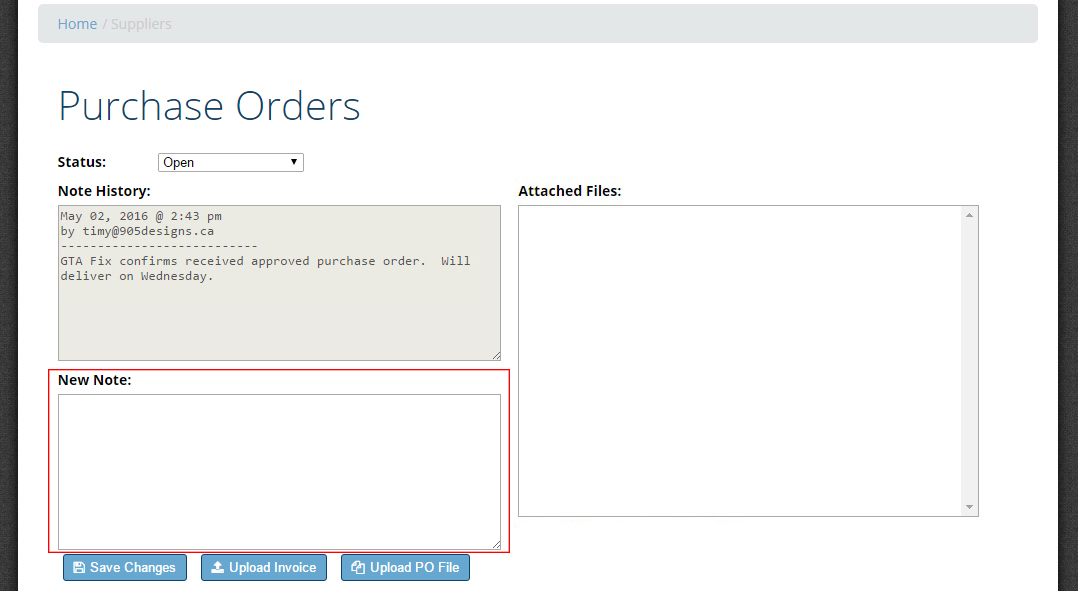
Once you click Completed and Save Changes, an automatic email notification will be sent to the person that assigned you the purchase order, informing them that the job is now complete. You can add comments to the work order, if there is information that you would like the assignee to know about the job click here:
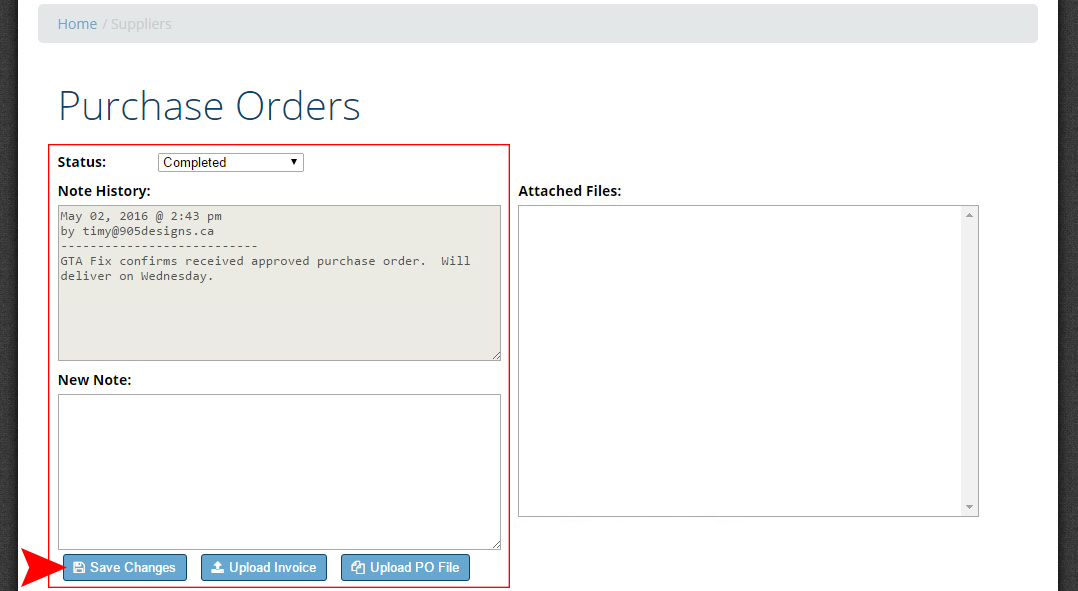
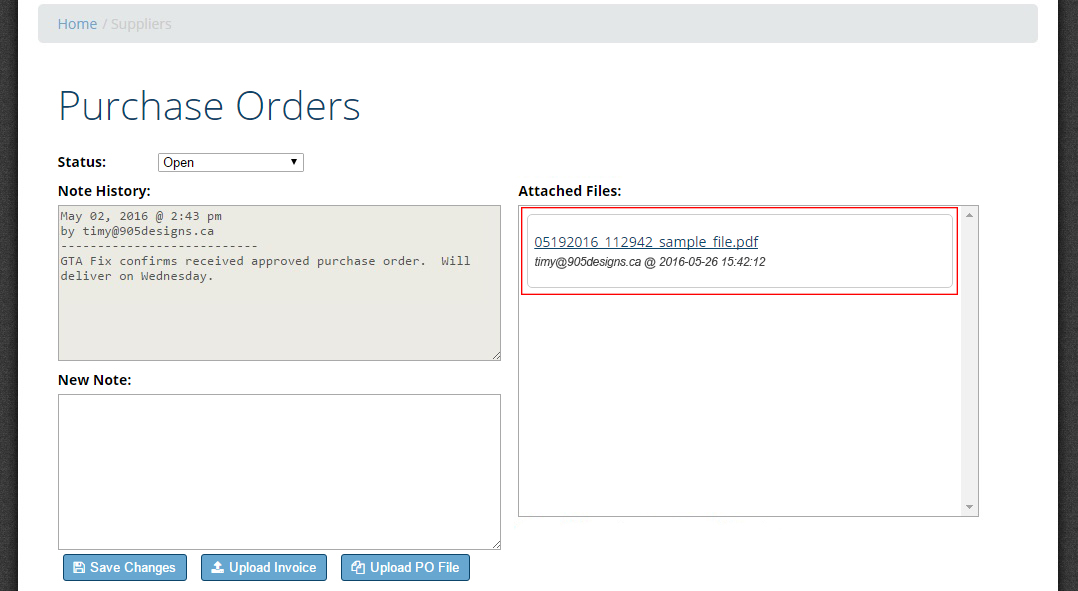
You may also upload a report or a document, related to the work order. This will be instantly visible by your client. To upload a document, click Choose File. Once a file has been chosen from your computer or device, click Save Changes. This will upload the document in the system.
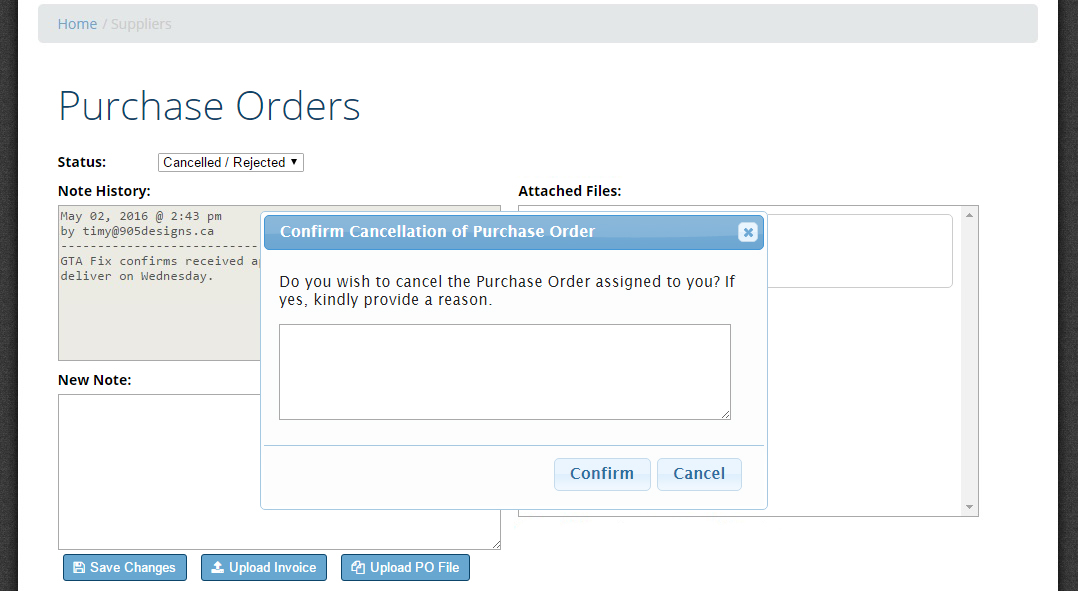
2E. Cancelling or Rejecting a Purchase Order
You have the option to reject or cancel a Purchase Order. To do so, click on the drop-down menu beside Status and change the status of the work order to Cancelled / Rejected then click Save Changes.

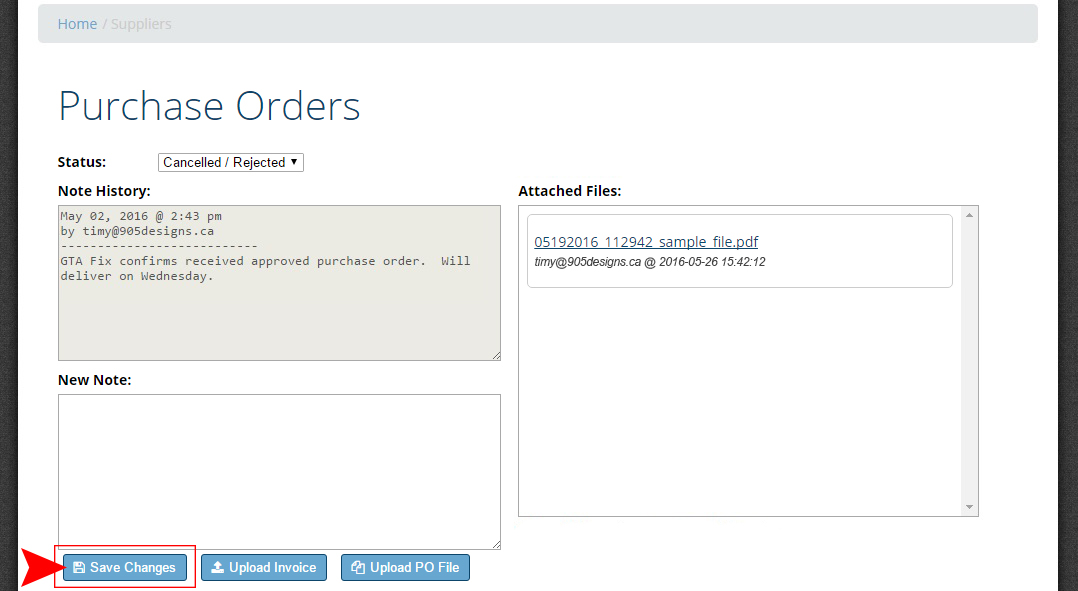
You are required to provide details as to why the Purchase Order is being cancelled or rejected. Once you click Confirm, the Property Manager and the assigned Customer Service representative will then receive an alert with the same details.
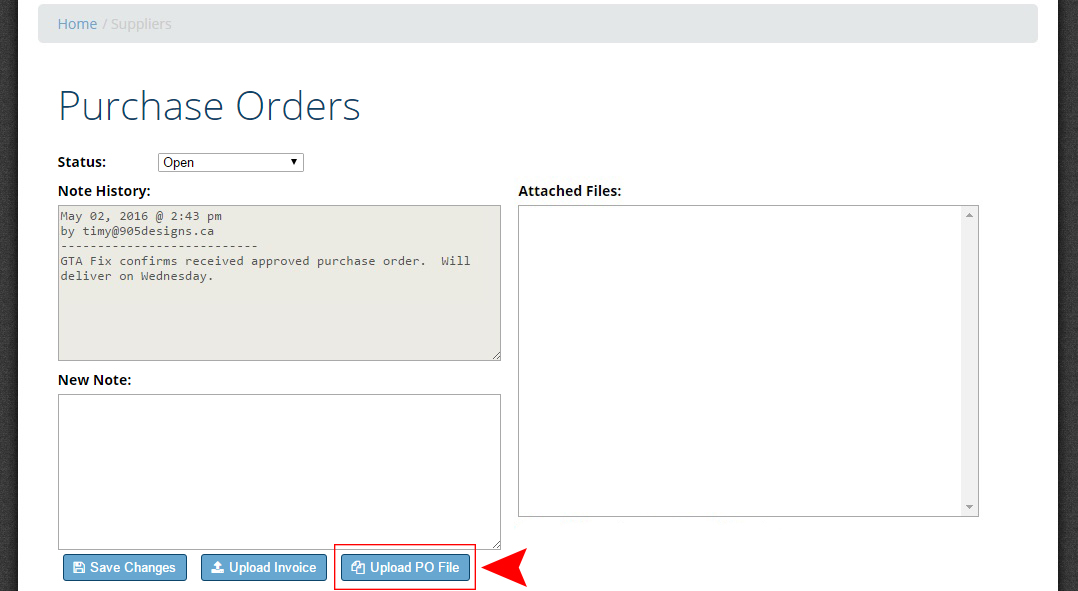
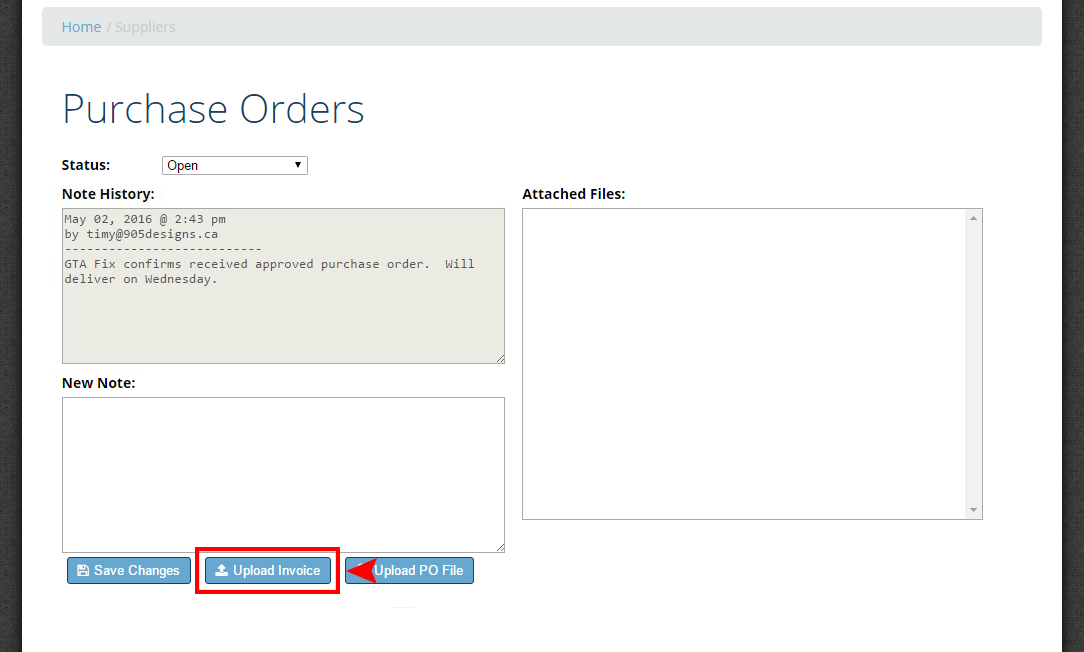
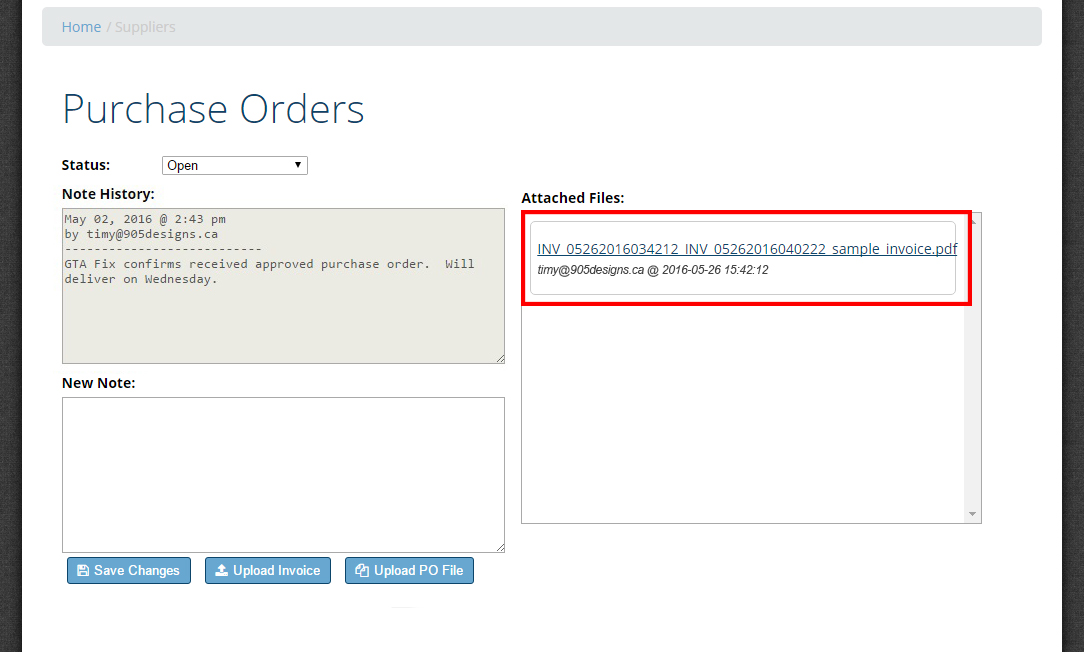
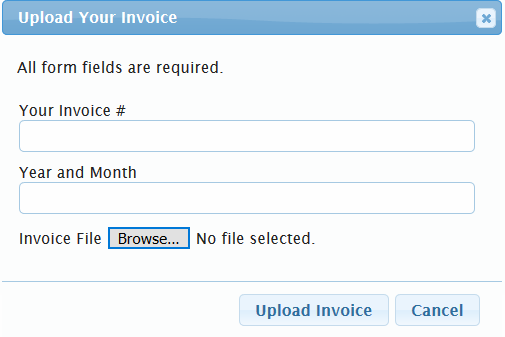
2F. Uploading Your Invoice To A Purchase Order
( Video tutorial available here )
You may also upload your invoice in the same panel. It is located at the bottom right of the page:
Once you click the Upload Invoice button, a pop-up window will appear. You are required to provide your 8-digit invoice. It is the same number you enter on your billing system.
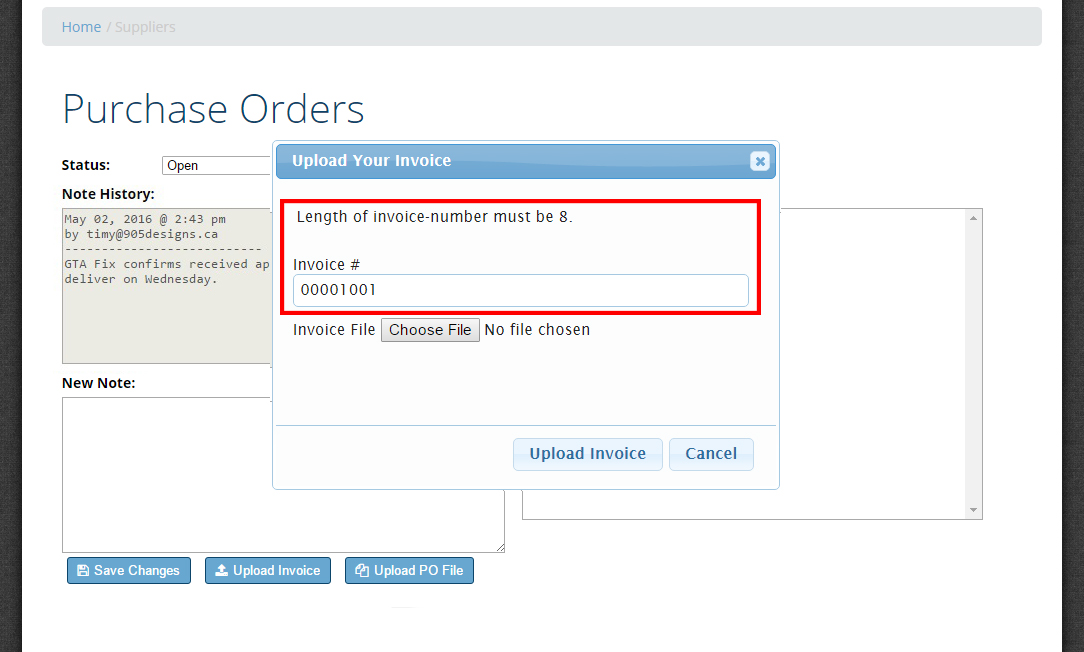
Provide your invoice number then click the Choose File button. Pick the invoice file from your computer or your device. Once a file has been chosen, you may upload it by clicking the Upload Invoice button.
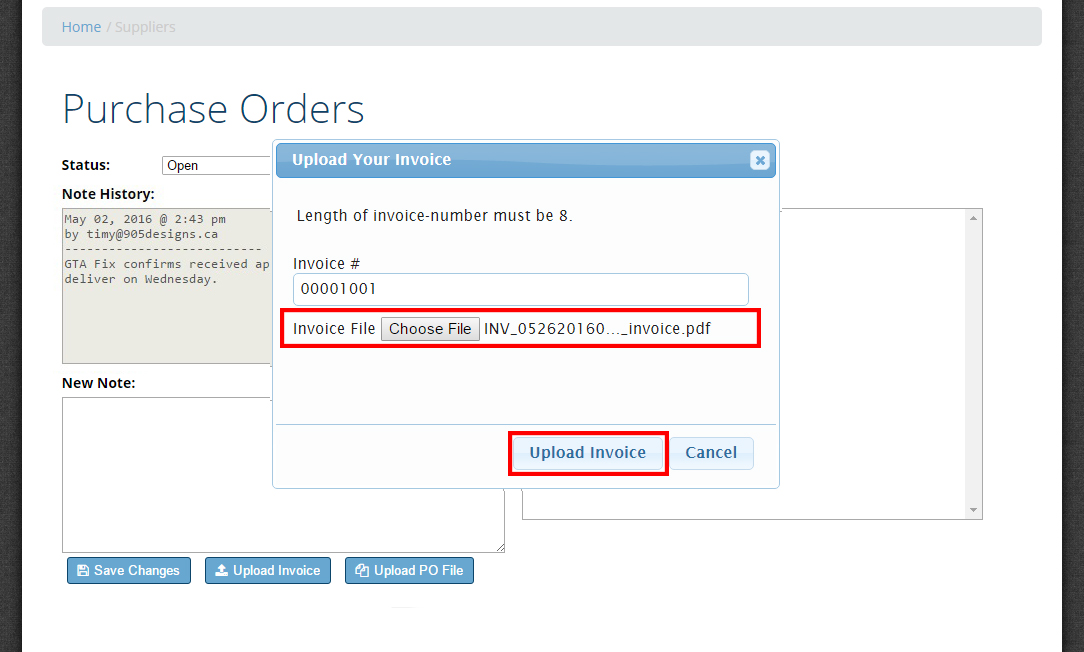
Your invoice is now uploaded in the system. Remember that by uploading your invoice electronically, there is no need to mail a copy.
2G. Uploading an Invoice For an Active Contract
( Video tutorial available here )
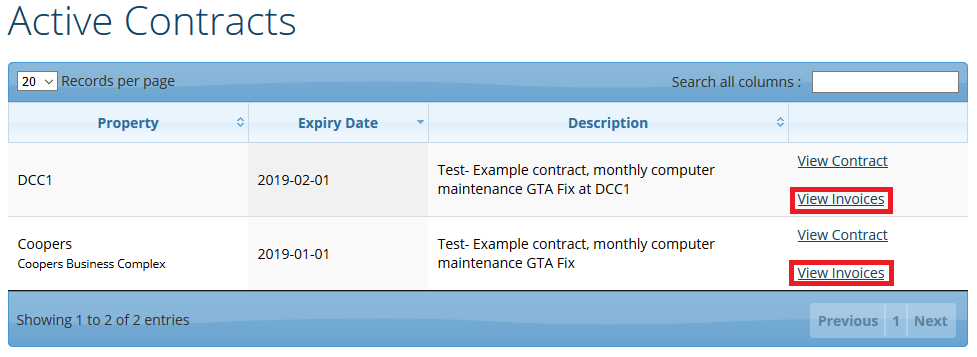
Suppliers are able to view Active Contracts by navigating to the Active Contracts page after signing into their Supplier Portal. This page will provide information on contracts that have been set up between a Property Manager and Supplier. Active Contracts will only be visible once entered by a Property Manager.
Clicking on the View Contract link will open up a copy of the contract for reference.
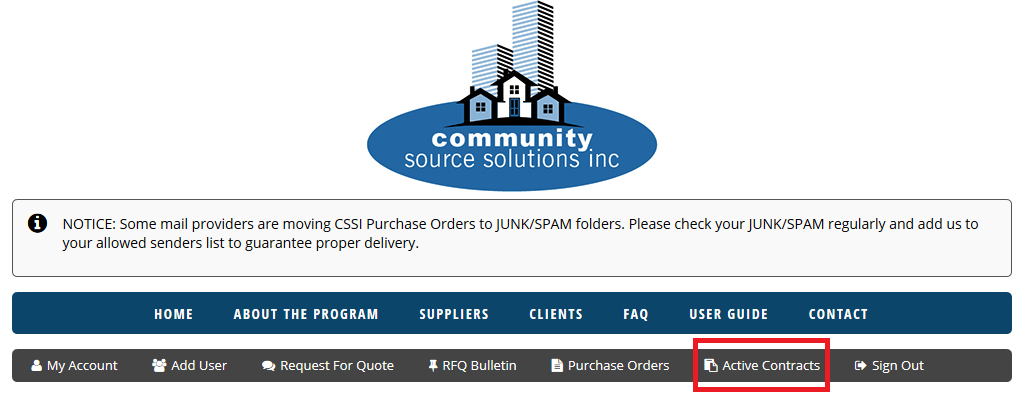
To upload an invoice for a contract, navigate to the Active Contracts page.
Choose the View Invoices option associated with the contract you wish to work with.
Click the Upload Invoice button to bring up the Invoice Upload window.
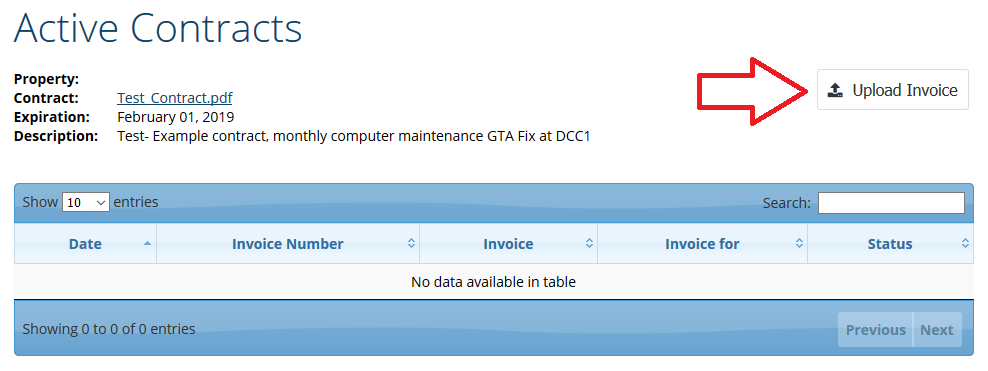
Fill in the required form fields, attach your invoice* and click Upload Invoice.
*Invoices must be in PDF file format.
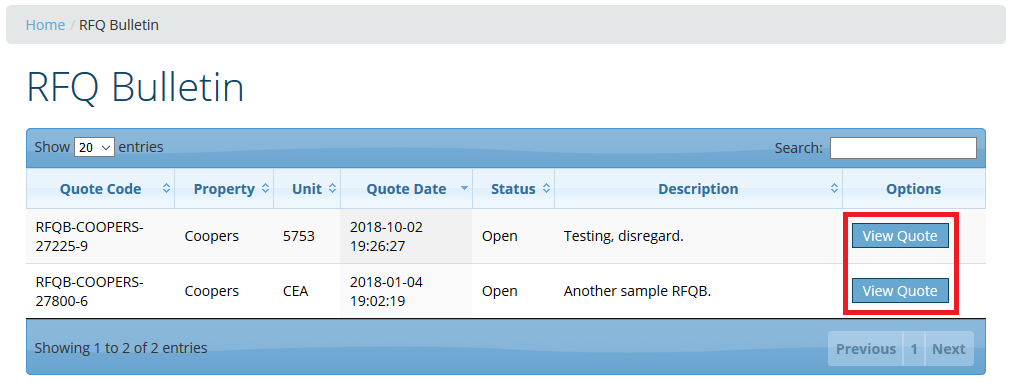
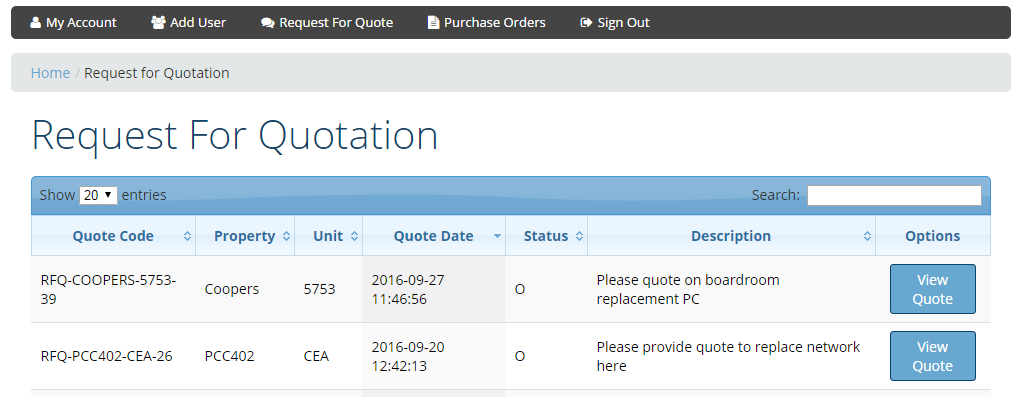
2H. RFQ Bulletin Board
Suppliers are able to view any requests for quotations that match their service category from Property Managers within the new RFQ Bulletin Board.
To access this feature, navigate to the RFQ Bulletin page.
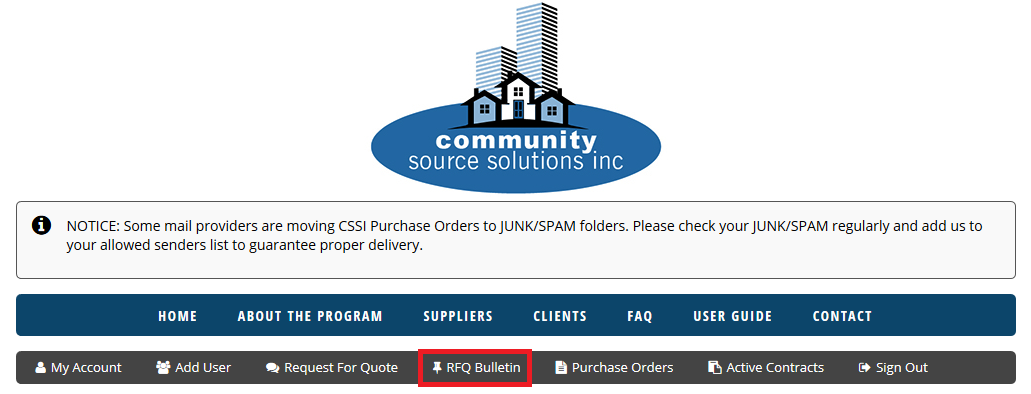
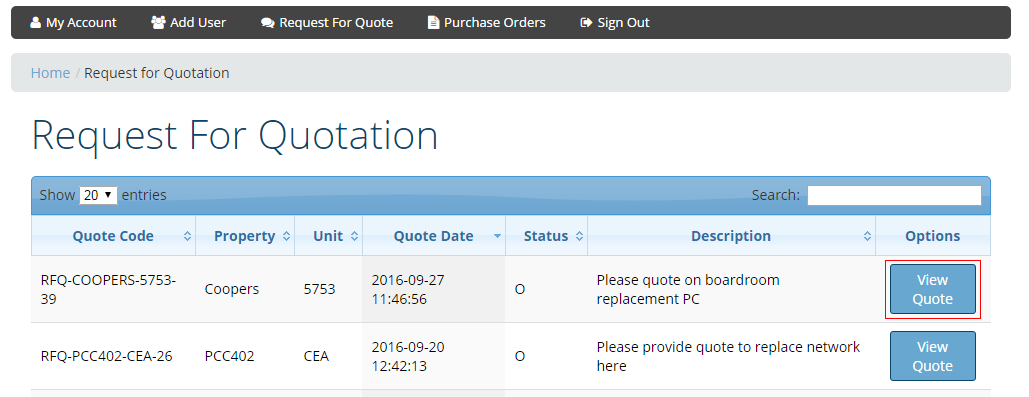
If there are RFQs available within your service category, you will see it listed on this page. To view an RFQ, click the View Quote button beside the entry.
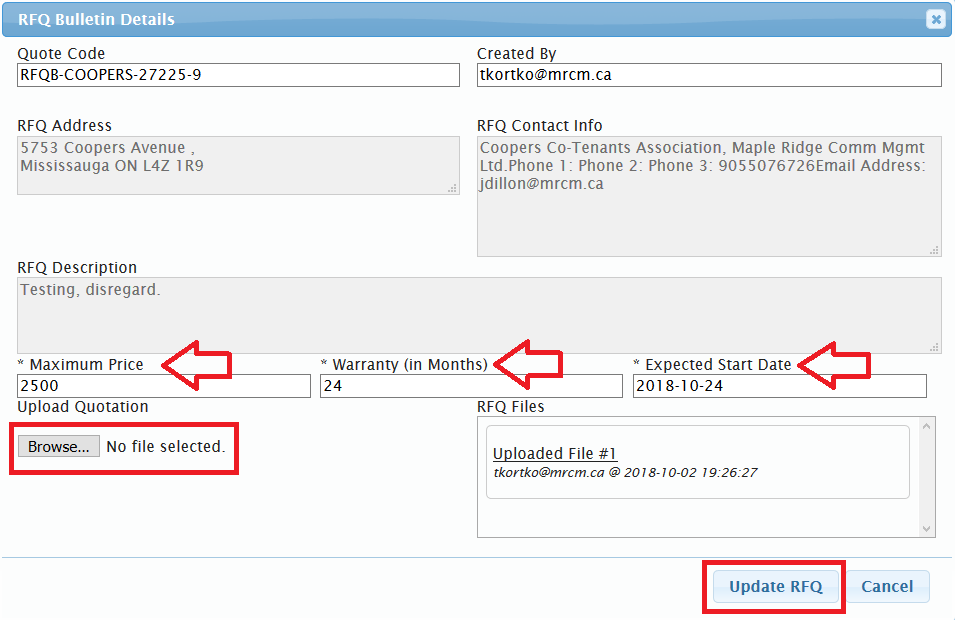
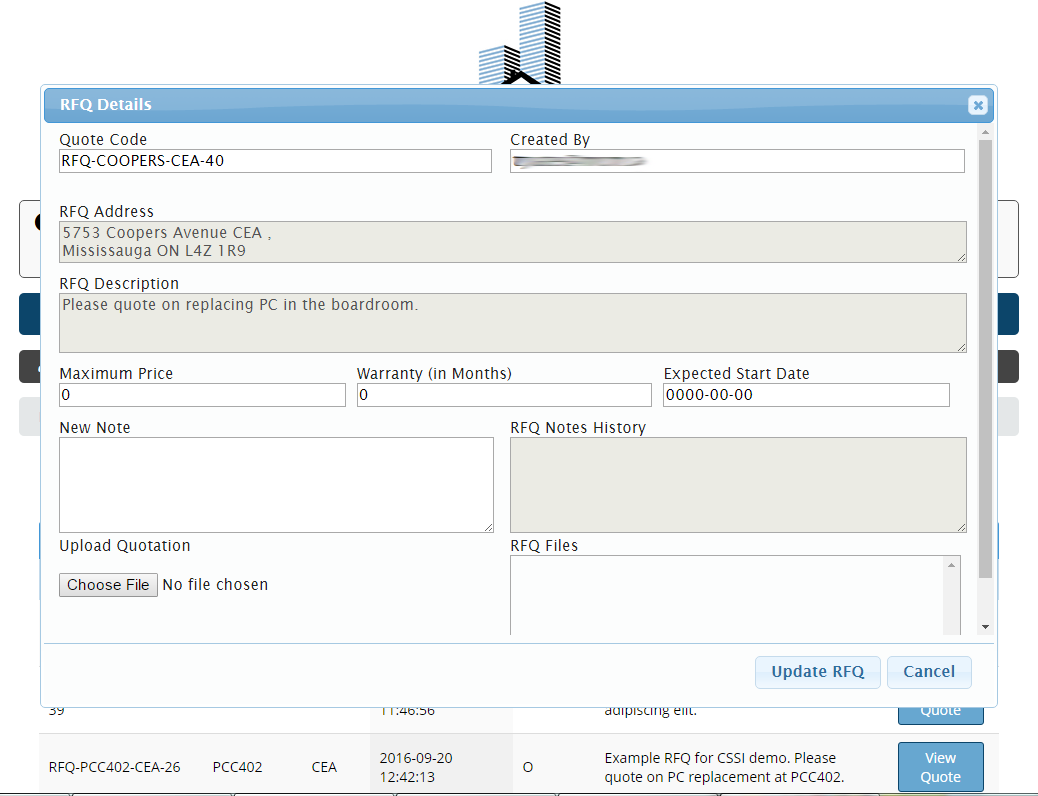
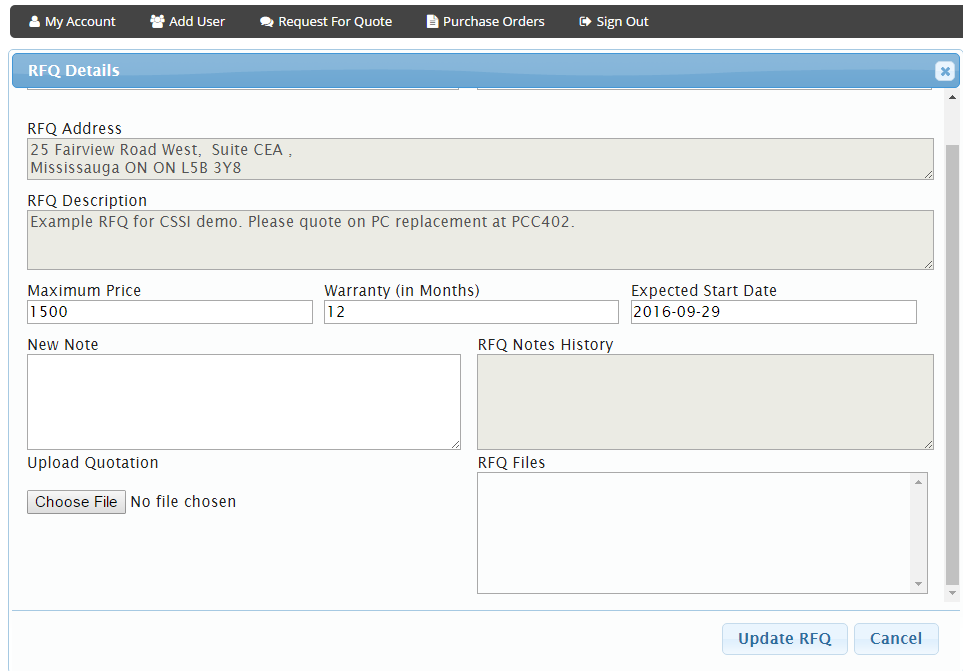
A dialog box will pop-up displaying the details of the selected RFQ. Here you can enter your Maximum Price, Warranty, Expected Start Date, and any other attachments you would like to upload. Afterwards, click Update RFQ to submit your proposal.
If a Property Manager chooses to approve your proposal, you will receive an email notification and the entry will be moved to your Purchase Orders page.
3A. Checking Your Quotation Request
( Video tutorial available here )
· Once you receive an e-mail advising that you have received a Request For Quotation (RFQ), click the link provided in the email. Alternatively, you may also visit the Request for Quote menu within your CSSI panel. Within the CSSI Request For Quotation panel, a list of all open RFQs is displayed.
By clicking View Quote, you can update each quote individually.
Within the Quote, you may add one attachment, an estimated start date, a warranty (if applicable) and a maximum price (if applicable). Comments may also be added to the New Note box if communication is required.
Please acknowledge receipt of Request for Quotation within 48 hours of receiving the notification email so that the Property Manager knows whether or not you intend to submit a quotation. You may do so by adding a notation in the “New Note” section.
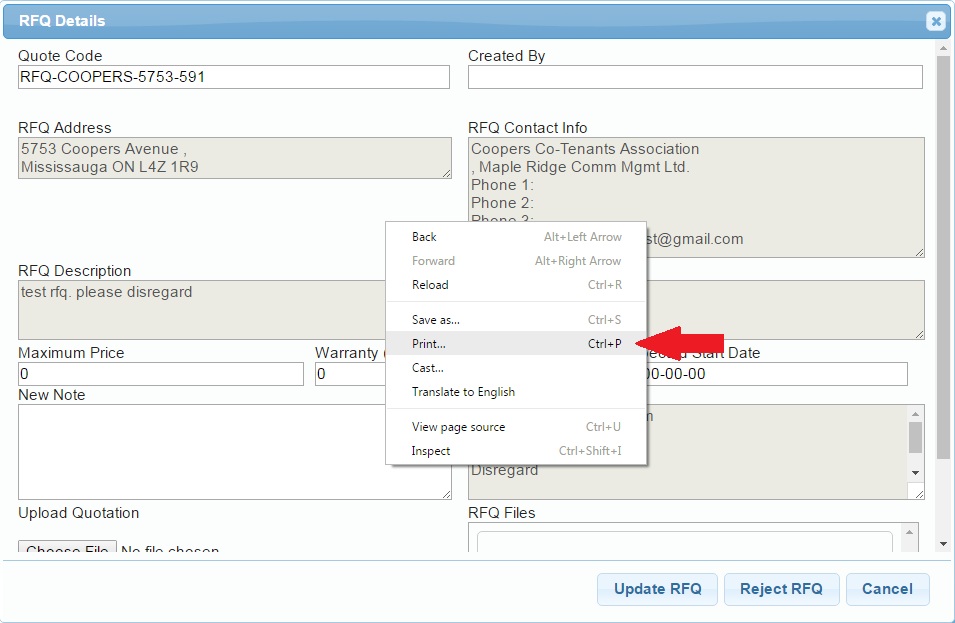
3B. Printing Your Quotation Request
Although it is advised to access your quote through the CSSI website, you can print your quotation for offline usage. Within the CSSI Request For Quotation panel, click on View Quote, and then right-click anywhere on the page and select Print... from the pop-up menu.
From the Print screen, click in the Layout drop-down menu and select Landscape orientation. After selecting the correct layout, expand the More Settings section by clicking on More Settings.
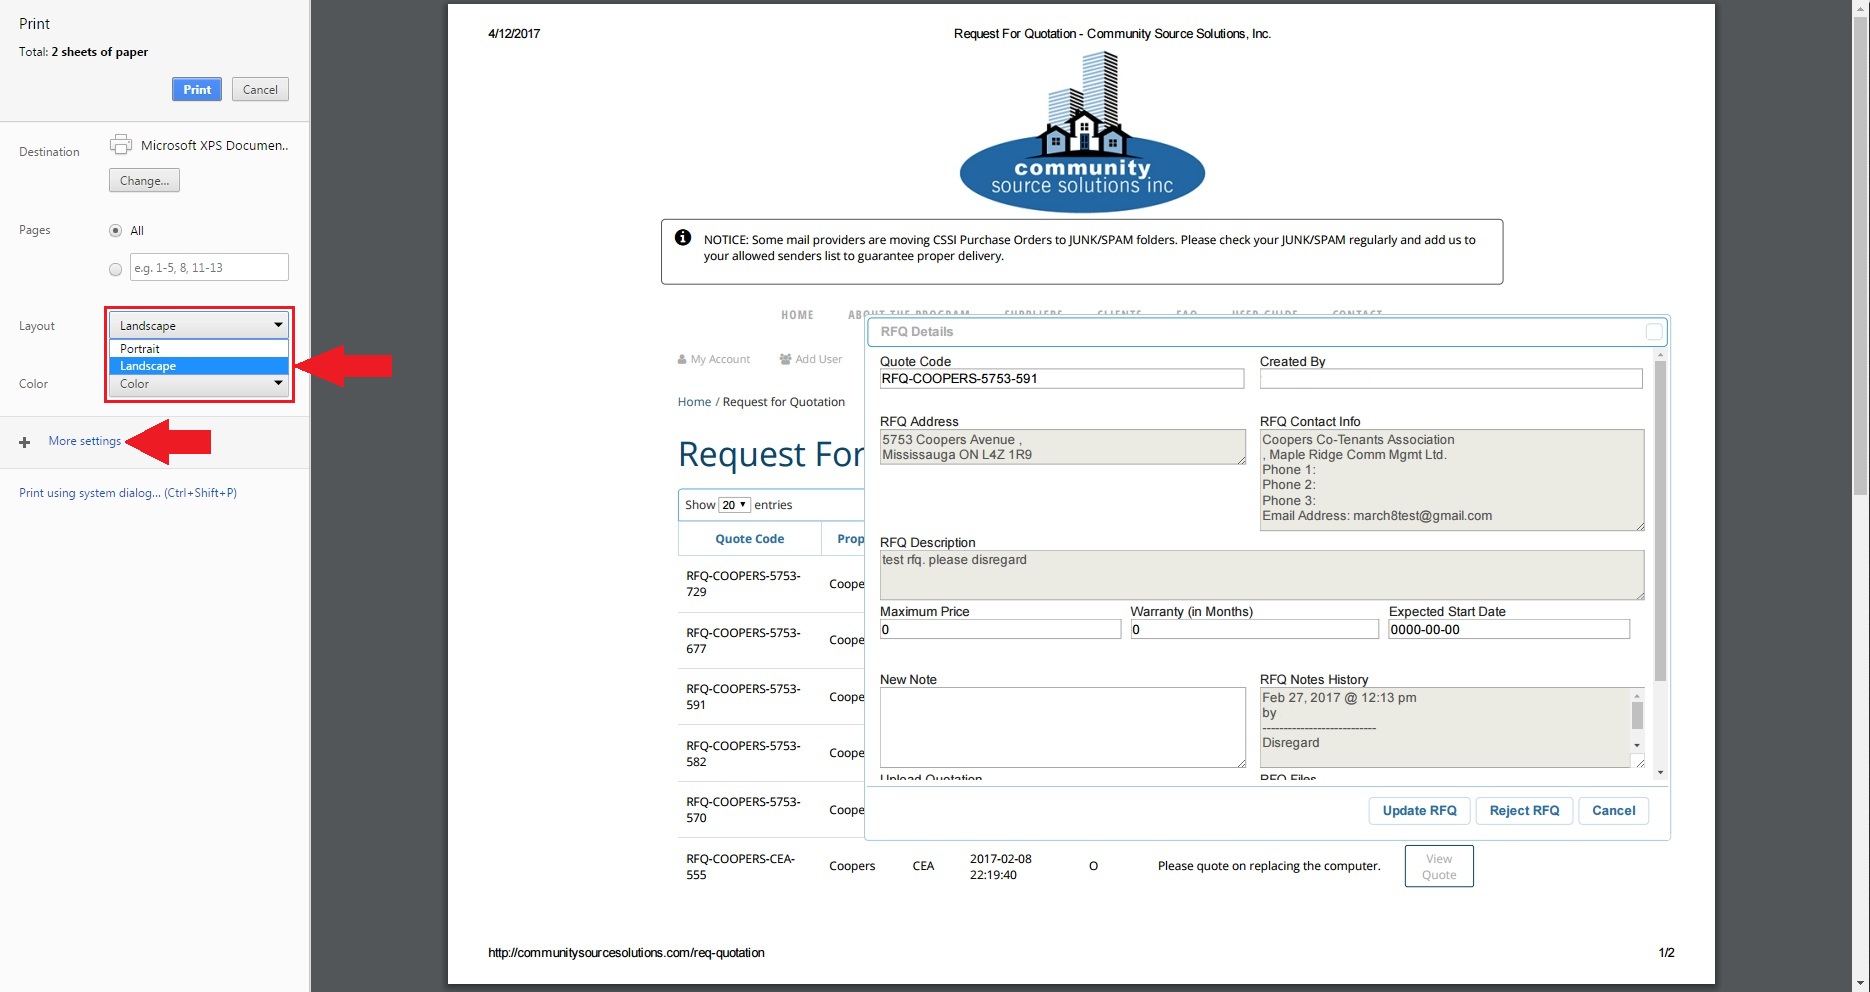
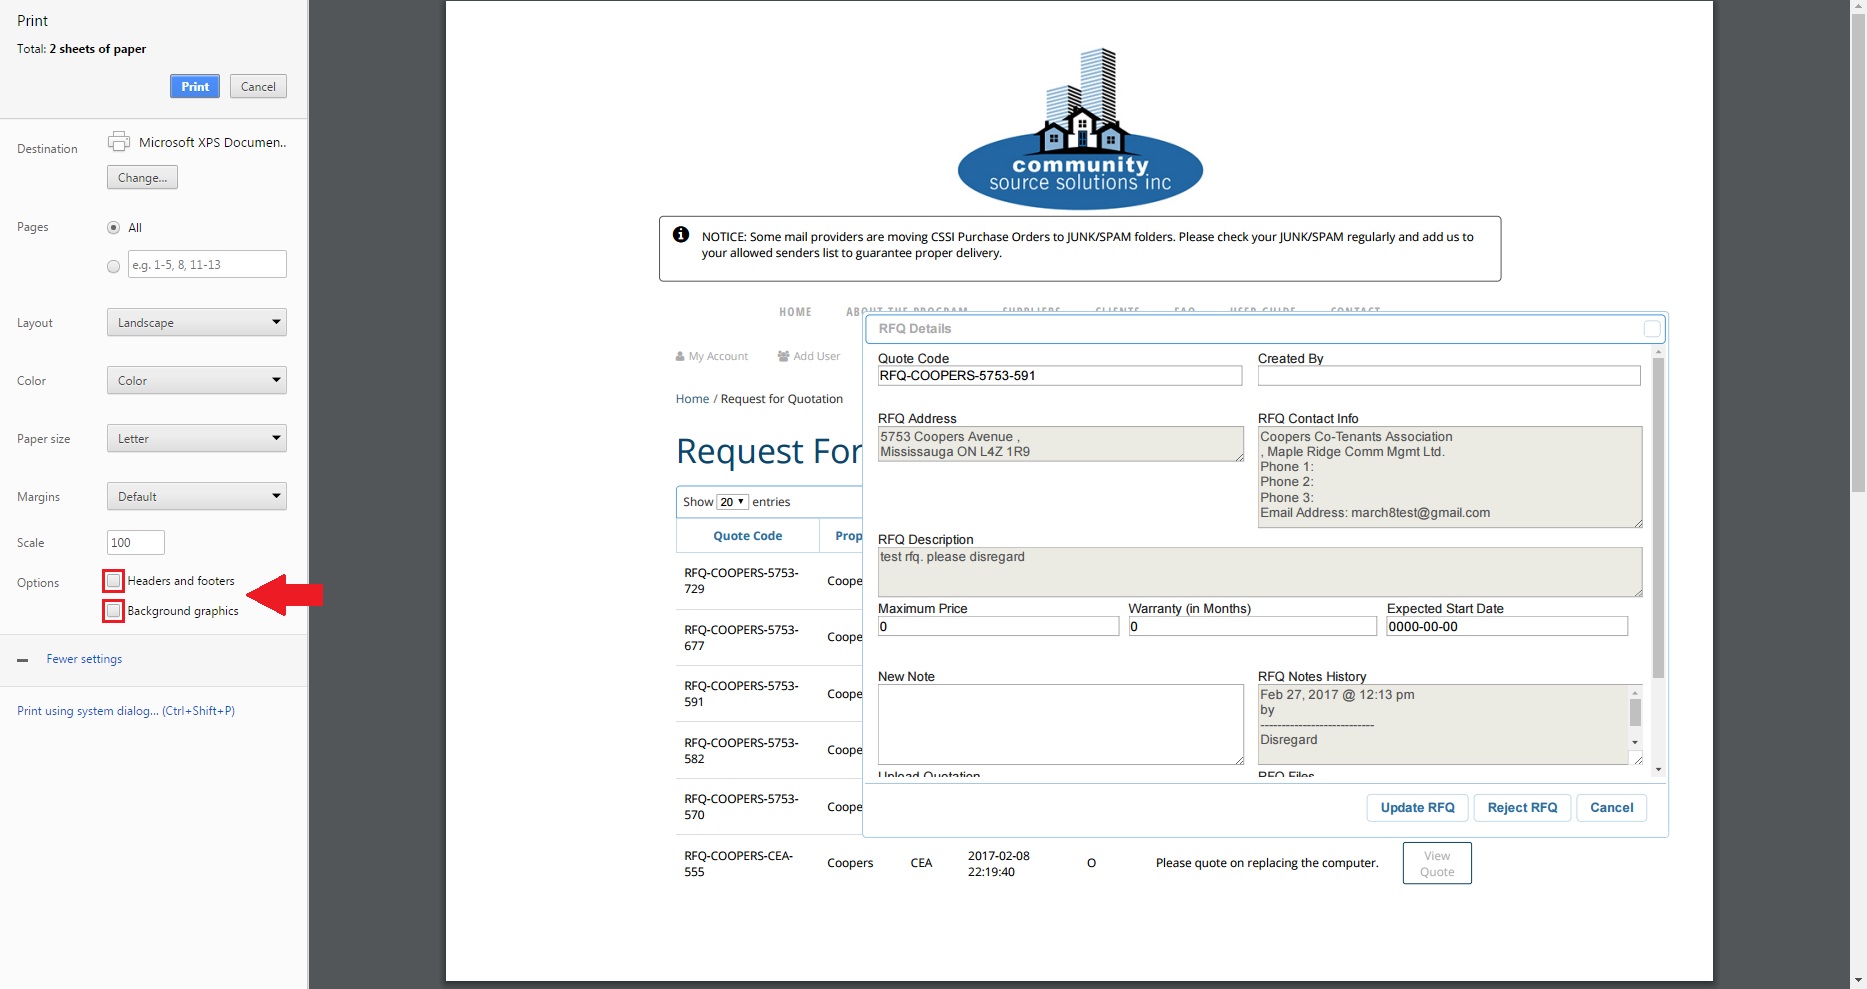
From the More Settings menu options, uncheck the Headers and Footers as well as the Background Graphics boxes. The quote should now be correctly formatted for and ready for printing as illustrated below.
4A. Having Trouble with Your Browser?
If you are experiencing troubles with your browser when using the CSSI website (printing purchase orders, etc.), please access it via Google Chrome. Please go to this link if you need help downloading and installing the browser.
4B. Tutorials
Community Source Solutions Inc. is available to assist you in maximizing your use of your Supplier Profile. To book a tutorial, please email info@communitysourcesolutions.com and type “Tutorial Request” on the subject line. We will schedule you in for tutorial to ensure that you are maximizing the capability of the program to your full potential.
4C. Questions/Tech Support
Contact our office (toll free) at 1-844-444-6400 to request support in maximizing your Supplier Profile.
Thank you!
The Community Source Solutions Inc. Team